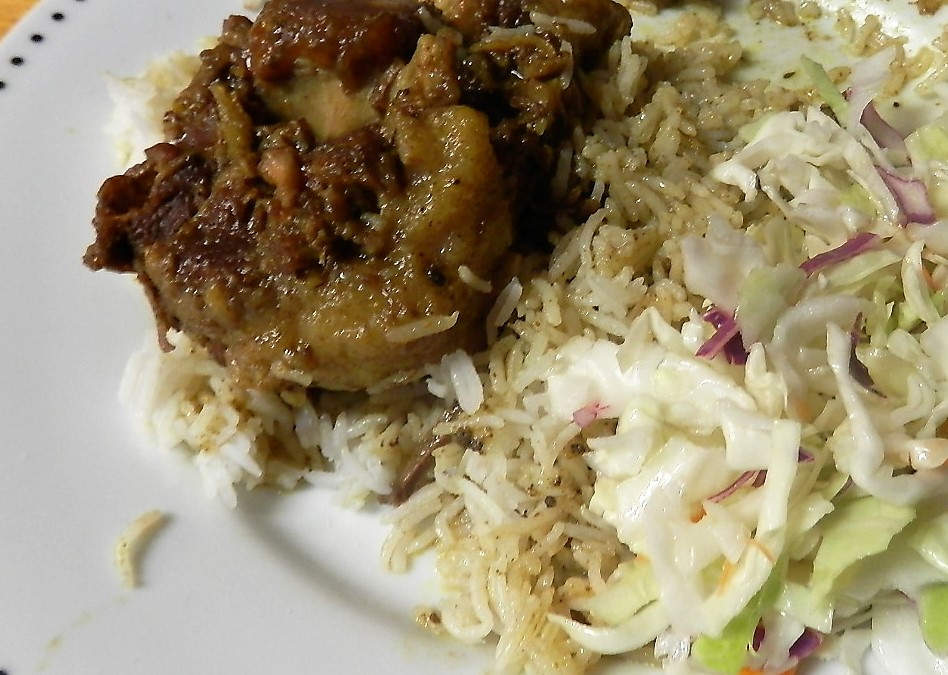
As any regular reader of this blog knows, I am a very big fan of Caribbean style oxtail.
Oxtail is a delicious meat that, when properly cooked, is wonderfully moist and full of flavour. While there are many ways to make oxtail, the spices and seasonings of the West Indies are among my very favourite.
Today we are going to look at how to braise oxtail stove-top in a Dutch Oven.
To begin, you want to heat some olive oil in the bottom of your Dutch Oven on the burner over medium-high heat. Season the oxtail liberally with black pepper and with salt to taste. Add your oxtail pieces when the oil is heated and brown the oxtail, stirring it regularly to make sure you achieve a consistent browning.
As you are browning the oxtail add the following seasonings to the meat. The portions used were for around 3 pounds of oxtail:
2 1/2 tablespoons curry powder
1 tablespoon cumin
1 tablespoon jerk seasoning
1 tablespoon mustard powder
3-4 cloves of minced garlic
Make sure to stir it all very well so that the seasonings are well distributed among the oxtail pieces.
When the oxtail is browned and the all the seasonings have been added, scrape any bits of meat or seasoning off the bottom so that they are loose and pour enough beef broth into the oven to just cover the meat. To this add 2-3 large pieces of crushed ginger, 2 bay leaves, 1-2 teaspoons of a Caribbean style hot sauce (I used El Yucateco's Caribbean hot sauce) and 1 tablespoon of soy sauce.
Bring the broth to a boil, reduce heat and simmer on the stove-top for 3 1/2 to 4 hours. You want to put the lid on, but leave it slightly askew so that it is a little bit open.
Stir the meat and broth up every 45 minutes or so while maintaining the simmer. While this should not happen if properly simmered, if you feel the liquid has reduced too much you can add a little more broth as necessary.
When finished the meat will literally fall off the bone when pulled with a fork. The slightly spicy, rich broth will serve as a nice gravy to pour over the meat when served as well as any rice on the side. If you wish you can thicken in with a bit of flour after cooking.
This oxtail dish is best if served with rice or rice and peas and goes very well with coleslaw, ice cold beer or red wine.
Enjoy.
See also: 12-Hour Slow Cooked Caribbean-Style Oxtail
See also: Caribbean Style Goat with Potatoes in a Dutch Oven
See also: Michael's West Indian Flavor: Perfect Oxtail in New Toronto
The Left Chapter has moved!
The Left Chapter has moved to a new domain.
You can visit us for all our new content at: https://www.theleftchapter.com/
Showing posts with label Dutch Oven. Show all posts
Tuesday, October 11, 2016
Stove-top Caribbean Style Braised Oxtail
Labels:
Caribbean Cuisine,
Dutch Oven,
oxtail,
West Indian cuisine
Wednesday, May 4, 2016
Lemon Garlic Chicken Thighs
Today we are going to take a look at a recipe for boneless, skinless chicken thighs that is truly delicious and that is in part inspired by Puttanesca-style pasta sauces.
This is made stove-top and can be done either in a large saucepan or in a Dutch Oven for larger quantities. We will be using a Dutch Oven and using measurements for making around 10-12 thighs.
First, season your chicken thighs liberally with black pepper and with sea salt to taste. Heat some olive oil over medium-high heat in your saucepan/Dutch Oven and then brown the thighs (in batches) for about 3 minutes a side.
Remove the thighs when browned and set aside on a platter.
Do not drain any of the remaining oil or juices. Add to it some more oil if needed, bring back to a sauteing heat and then add 8 minced cloves of garlic, 8 anchovy fillets, a teaspoon of red chili flakes (or to taste) and a small jar of capers. Stir constantly while trying to break-up and dissolve the anchovies and brown the garlic. This should take around 3-5 minutes.
When this is done, put the chicken back in the Dutch Oven, add enough chicken stock to just cover the chicken. Also add the juice of 1 lemon. Bring to a boil, reduce heat, cover and simmer the chicken until done, normally around 30-40 minutes.
This is a tart and very flavourful chicken dish that pairs especially well with vinho verde or other chilled white wines.
I like to serve it on top of rice, in its sauce, with some sliced baguette style bread on the side.
Enjoy.
See also: Slow Cooker Seasoned Whole Chicken
See also: Sauteed Seasoned Chicken Breasts in a Garlic Mushroom Sauce
Friday, April 8, 2016
Dutch Oven Veal Scaloppine Picatta with Mushrooms
Veal scaloppine are very thinly cut slices of veal that can be prepared several different ways.
One of my favourite is to bread and deep fry them (using a technique we looked at in a previous post) and then serve them with lemon wedges.
But another way I like to make scaloppine is "picatta" style, which is simmered in lemon and white wine. Usually this is done in a saucepan, but if you are making a lot of veal (for a party or big family dinner) I have adapted a technique used for making layered scalloped beef in a Dutch Oven that works very well in this case and that produces a rich, thick and tart sauce.
For the present blog, I made around 10 scaloppine pieces, which ended up being two layers in the Dutch Oven.
First, you take your scaloppine and dredge them in flour seasoned liberally with salt and freshly ground black pepper.
Heat some olive oil in the bottom of your Dutch Oven over medium-high heat on the stove-top until ready to fry and, in batches, brown the veal about 30 seconds a side.
Set the veal aside and then, without cleaning out the bottom of the Dutch Oven, add some more olive oil and heat and then add 2 cups of sliced mushrooms and 4 cloves of minced garlic. Saute the mushrooms and garlic for 4-5 minutes, scraping the bottom of the oven as you do so. When they are done, remove the mushrooms and set aside in a bowl.
Remove the Dutch Oven from heat and allow to cool for a couple of minutes. Then place a layer of the browned scaloppini across the bottom of the oven. Top this with some of the sauteed garlic and mushrooms in proportion to how many layers of scaloppini you will have. In other words, if you are going to have 2 layers of scaloppini use half of them, 3 layers 1/3 of them, etc. Repeat this process until done.
Also pour the juice of a half a lemon over each layer.
When you are finished layering add enough dry white wine (I used a Portuguese wine Gatao that I am very fond of, but you can use any dry white) to just barely cover the layers of veal and mushroom.
Bring the wine and lemon juice to a boil on the stove-top and then reduce the heat, cover while leaving the lid slightly off at a couple of edges, and simmer the veal for 20 minutes.
Serve the scalopinni topped with the garlic mushrooms and the delicious and zesty sauce that is produced.
Enjoy.
Saturday, December 5, 2015
Pepper Goat Soup
Today I am going to share a recipe that is inspired by two widely disparate dishes. This combines the spiciness and use of goat found in a Nigerian soup with the braising of the meat in red wine and the use of a lot of black pepper found in some Italian dishes.
Nigerian pepper goat soup is a wonderful, very spicy dish that is relatively easy to make, but sadly the seasonings and spices used are not widely available. (It, ironically, is not generally made with black pepper despite the name.) Here we "get around" this by including seasonings and techniques used for braising and simmering beef and veal (generally) that come from Italian cuisine among others.
First, take the goat meat (bone-in) and put it in the bottom of a Dutch Oven. Here we are using measurements for 2 pounds of goat meat. Season the goat very liberally with freshly ground black pepper (you want to use a fair bit), salt to taste, 4-6 cloves of finely minced garlic, 1-2 tablespoons of a habenero style hot sauce (or 1-2 unseeded scotch bonnet peppers cut into quarters) and 1 teaspoon of mustard powder.
Pour about a quarter cup of olive oil over the goat meat and and stir it all gently until all the seasonings and oil are evenly distributed.
If possible, let sit at least 2 and up to 12 hours in the fridge and then 1/2 an hour at room temperature. If you need to get started quickly let sit 45 minutes at room temperature.
When ready to cook, brown the goat meat for around 5 minutes over medium-high heat adding extra oil if necessary (it will likely not be). When the meat is browned, add around 2 cups of a hearty red wine and 2 cups of beef broth. The key is that they cover the meat almost entirely but not more than that. Add 1 tablespoon each of soy sauce and Worcestershire sauce. Finally add one heaping tablespoon of tomato paste.
Stir and bring to boil in your Dutch Oven on the stove-top. Reduce heat and simmer, top off, for 2 hours. While simmering add equal measures of red wine and stock as necessary if the broth reduces too much. After an hour or so of cooking taste the broth and add salt, pepper and hot sauce as desired.
This is a delicious blend of flavours and the goat will be fall off the bone tender.
When the goat is close to finished, make some rice on the side. Spoon small servings of rice into bowls and pour the soup over the rice to fill the bowl.
Enjoy with some crusty bread, a nice salad, some extra hot sauce and some more wine or cold beer of course!
See also: Caribbean Style Goat with Potatoes in a Dutch Oven
See also: Slow Cooked Curried Goat Stew
Nigerian pepper goat soup is a wonderful, very spicy dish that is relatively easy to make, but sadly the seasonings and spices used are not widely available. (It, ironically, is not generally made with black pepper despite the name.) Here we "get around" this by including seasonings and techniques used for braising and simmering beef and veal (generally) that come from Italian cuisine among others.
First, take the goat meat (bone-in) and put it in the bottom of a Dutch Oven. Here we are using measurements for 2 pounds of goat meat. Season the goat very liberally with freshly ground black pepper (you want to use a fair bit), salt to taste, 4-6 cloves of finely minced garlic, 1-2 tablespoons of a habenero style hot sauce (or 1-2 unseeded scotch bonnet peppers cut into quarters) and 1 teaspoon of mustard powder.
Pour about a quarter cup of olive oil over the goat meat and and stir it all gently until all the seasonings and oil are evenly distributed.
If possible, let sit at least 2 and up to 12 hours in the fridge and then 1/2 an hour at room temperature. If you need to get started quickly let sit 45 minutes at room temperature.
When ready to cook, brown the goat meat for around 5 minutes over medium-high heat adding extra oil if necessary (it will likely not be). When the meat is browned, add around 2 cups of a hearty red wine and 2 cups of beef broth. The key is that they cover the meat almost entirely but not more than that. Add 1 tablespoon each of soy sauce and Worcestershire sauce. Finally add one heaping tablespoon of tomato paste.
Stir and bring to boil in your Dutch Oven on the stove-top. Reduce heat and simmer, top off, for 2 hours. While simmering add equal measures of red wine and stock as necessary if the broth reduces too much. After an hour or so of cooking taste the broth and add salt, pepper and hot sauce as desired.
This is a delicious blend of flavours and the goat will be fall off the bone tender.
When the goat is close to finished, make some rice on the side. Spoon small servings of rice into bowls and pour the soup over the rice to fill the bowl.
Enjoy with some crusty bread, a nice salad, some extra hot sauce and some more wine or cold beer of course!
See also: Caribbean Style Goat with Potatoes in a Dutch Oven
See also: Slow Cooked Curried Goat Stew
Thursday, November 26, 2015
Beef Shank Potato Carrot Dutch Oven Casserole -- Revisiting an 80's Leftover Roast Beef Recipe
Today we are going to take a look at a vintage 1985 recipe from an Ontario community cookbook for "Roast Beef Hash" and reinvent it a bit.
I came across this recipe in the St. Paul's 25th Anniversary "Our Favourite Recipes" cookbook, part of a type of fundraising cookbook that I love and that examples of which we have looked at before on our cookbook TBT features. This one was to aid a church in Golden Valley, Ontario. The recipe immediately appealed to me as easy, thrifty and likely really good.
While I think the recipe would work fine on its own, and probably would turn out to be quite tasty, I thought a few changes might make it even better than it sounded on paper while keeping the essence of the original. These included using beef shank in place of leftovers and cooking it stove-top in a Dutch Oven instead of in a casserole.
First, to keep it thrifty we are going to use cuts of beef shank. This is a very inexpensive cut of meat, usually bought bone-in, that can be truly delicious though it requires long cooking times.
Take the beef shank and season it liberally with salt and pepper to taste. For this recipe we used four shanks. Once seasoned, dredge the shanks in flour until nicely coated on both sides.
Meanwhile, heat some extra virgin olive oil in the bottom of a Dutch Oven to medium-high on the stove top and brown the shanks for about one minute a side so that they they look as pictured. Remove them and set aside as you brown the others.
When they are all browned place all the shanks back into the Dutch Oven without draining any of the juices. Add 4 cloves of minced garlic, enough water to just cover the shanks, and an appropriate amount of onion soup mix. So, for example, if you use four cups of water, as we did, then use as many packets of the soup mix as needed according to their instructions as if you were making the soup.
Bring this to a boil and then lower temperature, cover and simmer for 3 hours.
After three hours have passed add one large diced onion. Cover and simmer for another half hour. Then add 2-3 potatoes chopped rustically into several pieces each and add two diced carrots. Again, cover and simmer for another half-hour.
At this point the beef should be fall apart moist and the vegetables nicely cooked and flavoured. Top with some chopped parsley.
Serve over egg noodles (if desired) in a bowl with crusty bread and/or with rice on the side. Goes perfectly with a table red and garden salad.
Inexpensive and a crowd pleaser! Enjoy.
See also: The Oliver: Reinventing a 50's Colossal Salami Sandwich -- Vintage Cookbook TBT
Labels:
beef,
beef shank,
beef stew,
Dutch Oven,
potato
Tuesday, February 10, 2015
Jerk Style Pulled Pork Sandwiches with Coleslaw & Jalapenos
With cold weather on the way, it is time to share a recipe for Jerk Style Pulled Pork sandwiches. These are ideal fall and winter cooking as they cook for a very long time in the oven and suit the season. We will be making it with coleslaw and pickled jalapenos for toppings. It is simple to make, and very flavourful. It is a terrific party or sport's gathering dish.
This is also the easy version in that many of the ingredients are store bought. In some future posts we will look at homemade vinegar and barbeque style sauces.
To start you need a 4-6 lb. pork shoulder. Try to get one with a good fat layer on the one side. A couple of bones in are fine. You remove them at the end.
Then you take Jerk Seasoning (Mr. Goudas makes one, among others) and spread it all over and rub it into all sides of the shoulder other than the fat side.. You want the shoulder fully coated. You do the same with a Jerk paste like the one made by Grace, again rubbing it in to the pork on all sides thoroughly, again other than the fat.
Place the coated pork shoulder in a Dutch Oven and, lid off, into an oven, preheated to 275.
You let the pork cook for 6-7 hours. You don't need to do anything at this point. Just leave it be.
After 6-7 hours, remove the shoulder and put it on a large plate. At this point you take off the fat layer and discard.
You take two forks and start to pull the shoulder apart. It will fall apart into threads very easily. Discard any bones.
Once you have pulled the entire shoulder apart you are ready to put it back in the dutch oven. Before doing that you should scrape off and remove any residue from the bottom of the dutch oven. Put the pulled pork back into the dutch oven and cover it with between one and two full bottles of Jerk style BBQ sauce. The amount depends on how large the shoulder was and how saucy you want it. For a larger shoulder you will need two full bottles. Grace makes a Jerk BBQ sauce, as do some others.
Serve on rolls or hamburger buns. I think it tastes best topped with a nice creamy style coleslaw and I usually add a few jalapenos (but it is already a bit spicy, so this depends on taste of course.)
This exact method, of course, can be used to make pulled pork of different styles. You can use different seasonings or BBQ sauces, including homemade ones. Watch for a future post on doing a spicy North Carolina style vinegar sauce.
With the leftovers you can try making Jerk Pulled Pork Tacos. Take hard-shell style tacos, put in the pulled pork as the base filling, top it with creamy slaw, then salsa or salsa verde, some sour cream and, if you like, hot sauce or jalapenos. This will be a big hit!
This is also the easy version in that many of the ingredients are store bought. In some future posts we will look at homemade vinegar and barbeque style sauces.
To start you need a 4-6 lb. pork shoulder. Try to get one with a good fat layer on the one side. A couple of bones in are fine. You remove them at the end.
Then you take Jerk Seasoning (Mr. Goudas makes one, among others) and spread it all over and rub it into all sides of the shoulder other than the fat side.. You want the shoulder fully coated. You do the same with a Jerk paste like the one made by Grace, again rubbing it in to the pork on all sides thoroughly, again other than the fat.
Place the coated pork shoulder in a Dutch Oven and, lid off, into an oven, preheated to 275.
You let the pork cook for 6-7 hours. You don't need to do anything at this point. Just leave it be.
After 6-7 hours, remove the shoulder and put it on a large plate. At this point you take off the fat layer and discard.
You take two forks and start to pull the shoulder apart. It will fall apart into threads very easily. Discard any bones.
Once you have pulled the entire shoulder apart you are ready to put it back in the dutch oven. Before doing that you should scrape off and remove any residue from the bottom of the dutch oven. Put the pulled pork back into the dutch oven and cover it with between one and two full bottles of Jerk style BBQ sauce. The amount depends on how large the shoulder was and how saucy you want it. For a larger shoulder you will need two full bottles. Grace makes a Jerk BBQ sauce, as do some others.
Stir all the sauce and pulled pork together and put it back in oven. Heat for about another hour with the oven set to minimum, stirring once or twice.
| Coleslaw is a great topping for pulled pork |
This exact method, of course, can be used to make pulled pork of different styles. You can use different seasonings or BBQ sauces, including homemade ones. Watch for a future post on doing a spicy North Carolina style vinegar sauce.
| Jalapenos, sliced, with some carrots in vinegar...hot! |
Subscribe to:
Posts (Atom)


