Showing posts with label bacon. Show all posts

Wednesday, January 2, 2019

Trini Gardens, Kothur, Zippy Pickle Soup & more -- The Top 5 Food Posts of 2018

A few days ago we posted the Top Ten Blog Posts of 2018 on The Left Chapter. As any regular reader of this blog knows, The Left Chapter also has many food related posts.

There have been posts about Beef Barley Soup w. Kale, Parsley & Carrots,  Quick and Easy Pan-Fried Salmon Burgers, Pasta Puttanesca -- A classic, rustic sauce easy to make at home, Curry Flavoured Clay Baked Red Chicken, Italian-Style Hero Sandwiches and many, many more!

We also looked at some favourite restaurants and vintage cookbooks such as with Parkdale's Little Tibet w. Sha-Bhaley & Momos or Cooking Cards of the Soviet Ukraine (Part I) w. Dushenina, Kiev Style Chicken Cutlets, Fried Duck with Apples and more.

I want to thank everyone who contributed recipes to the blog and to our readership for such a great year and I look forward to what 2019 brings.

Here, without further ado, are the top five food related posts for 2018:

1) Trini Gardens Brings Excellent West Indian - Chinese Fusion to South Etobicoke

2) Kothur Indian Cuisine's fantastic lunch special in Mimico

3) Zippy Pickle Soup

4) Clay Baked Peameal Bacon Roast

5) Clay Baked Caribbean Style Curried Chicken w. Green Seasoning and Scotch Bonnet Pepper Sauce

Thanks again for a great fourth year.

Do you have a left point-of-view or opinion, a recipe or a story you want to share?

Send them to The Left Chapter via theleftchapter@outlook.com!


Tuesday, December 11, 2018

Peppercorn Pork Chops with Bacon Sauerkraut

Today we are going to look at an old-school style pork chop dish that is based upon a variety of similar recipes I have seen in cookbooks like Dominion's "Its Mainly Because of the Meat" from 1969. I have taken the best parts of some of these recipes and jazzed them up a bit technique and ingredient wise.

What you get is a great, classic combination of flavours and pork chops that are tender and delicious.

To begin, in a large saucepan cook around six pieces of bacon until done and set aside.


In the same pan use the left over bacon fat (draining some off first if necessary) to saute one large chopped onion seasoned with salt and pepper to taste. Do this over medium-high heat for around 5 minutes. Set the onion aside. 


Season your pork chops with salt and pepper to taste. We made 6 chops which were bone-in. Again in the same pan brown your pork chops in batches for about 2 minutes a side over medium-high heat and set aside when done. If necessary add a little olive or vegetable oil for the browning.


Remove the pan from the heat but do not clean. When the pan has cooled place the now cooked bacon across the bottom of the pan. Cover the bacon with a layer of sauerkraut. The sauerkraut should cover the entire pan. I used a whole bottle. Season the sauerkraut with two teaspoons of mustard powder, 1 teaspoon of cayenne pepper (or more to taste) and then approximately 30 peppercorns evenly distributed throughout.


Place your browned chops evenly on top of the bed of sauerkraut.


Now cover the chops with the sauteed onion.


Pour 2 cups of chicken broth and one cup of a dry white wine into the pan. Bring the liquid to a boil and then reduce heat and simmer, covered, for one hour.


Serve the chops with the onion and bacon sauerkraut atop or on the side. The dish also goes well with either sour cream or Dijon mustard (or both) on the side. I like to have it with noodles as well.


This is a terrific meal, especially this time of year.

 Enjoy.

See also: Diner Style Breaded Pork Chops in Gravy

See also: Slow Cooker Beer and Sauerkraut Sausages

See also: Frenched Pork Rack Roast with Montreal Steak Spice.

Monday, June 4, 2018

Clay Baked Peameal Bacon Roast

Any follower of The Left Chapter's food related posts knows that I am a big fan of making a whole variety of different dishes in a clay baker. Clay bakers are terrific for slow cooking and producing very tender, flavourful mains. They are especially good to use when making chicken. Clay bakers also become more seasoned as you use them over the course of years. 

For a basic introduction to clay baking you can refer to a post I did on a blog that was rolled over into The Left Chapter, The simple art of Clay Baking: Fast, easy & delicious. 

Today is the first of a couple of posts dedicated to using your clay baker in ways that may not immediately spring to mind. 

One dish that cooks really, really well in the clay baker, for example, is a peameal bacon roast.

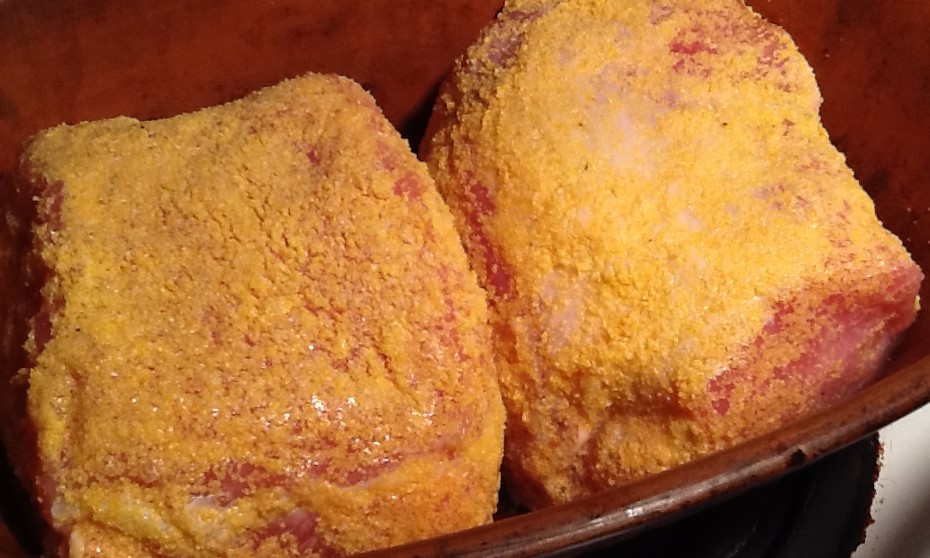
Peameal bacon roasts, of course, are boneless, wet cured pork loin roasts that have been rolled in cornmeal. Once cooked and sliced they make terrific sandwiches. When done in a clay baker they come out spectacularly moist, and with the use of a simple technique you can also brown the roasts to give the cornmeal topping a very satisfying texture. 

To begin, as always, soak both halves of the clay baker in water for 15-20 minutes. 

Add your pork loin roast into the bottom of the baker and then add 1/4 cup of water. Here we made two roasts at once. 


Put the lid on and place the baker into a COLD oven (you never put a clay baker into a preheated oven, it will crack). Turn the heat to 350 degrees and cook for 75 minutes. 

After 75 minutes remove the lid of the clay baker and turn the heat up to 450 degrees. Let cook, open like this, for another approximately 30 minutes or until the top is nicely browned. (For the record, Health Canada recommends cooking pork until it reaches an internal temperature of at least 160 degrees if you are at all concerned).   

Remove the roast from the oven and then let sit for around 10 minutes prior to slicing. Discard any liquid left in the clay baker. 


Slice to your liking. You will find that the slices are not simply more tender but are also more flavourful then when you do this using the more conventional oven roasted method or when done in a slow cooker. 


Now, of course, the loin slices can be had with eggs, rice and salad, or with whatever you like. But they make amazing sandwiches. 


Sliced, well prepared peameal bacon on a fresh bun with a tomato slice, some red onion and Dijon mustard is a treat that is very hard to beat! 

Enjoy.


Thursday, May 5, 2016

Winnie-the-Pooh's Spinach & Bacon Salad Revisited -- Vintage Cookbook TBT

Recently we took a look at The Pooh Cook Book, a charming cookbook from 1973 that has recipes inspired by the Winnie-the-Pooh stories.

In among the recipes is one for a spinach and bacon salad that I thought worth revisiting and jazzing up a bit!

Spinach and bacon work really well together both in terms of flavour and texture. There are two versions in the book -- one hot and one cold. We are going to do a take on the cold one as I prefer cold spinach to hot.

But either way the dressing would be the same.

First you want to take your spinach leaves and wash, drain and dry them.

Then cook at minimum the 4 strips of bacon that the original calls for. I prefer more like 5 or 6...though of course it depends on how much spinach you are making as well.

Cook the bacon until very well done. You want it to be very crispy and to crumble easily. Do NOT give into "convenience" and use bacon bits...they are not at all the same as the real thing! Let the bacon cool to room temperature.

Meanwhile whisk together a dressing with the following ingredients using more-or-less depending on how much spinach you made and how dressed you want it.:

2 tablespoons of Dijon Mustard
1 tablespoon of extra virgin olive oil
The juice of one half lemon
Fresh black pepper to taste
1 finely minced clove of garlic or garlic powder to taste
A few dashes of Tabasco sauce (2-4 generally)

Toss the spinach with the dressing until coated evenly and then add the bacon, crumbled into whatever sizes you like, and toss again. I like the bacon in slightly bigger half slice pieces.

Given bacon's inherent saltiness, be sure to taste your salad before adding any more salt if needed.

This refreshing salad is terrific as a side or as a lunch.

Here it is pictured served with a Boneless Slow Roasted Pork Loin Roast with which it went well.

Enjoy

See also: Sardine Sandwich with Sauteed Spinach, Garlic & Jalapeno

See also: Spinach, Mushroom and Walnut Pie


Saturday, February 7, 2015

Pooh's Fireside Recipes: Comfort food for kids of all ages with Potato Pancakes & Honey Cake


Vintage Cookbook: Pooh's Fireside Recipes, Katie Stewart
Publication Details: Methuen Children's Books, 1985

Inspired by A. A. Milne's classics Winnie-the-Pooh and The House at Pooh Corner the truly charming cookbook, Pooh's Fireside Recipes was published in the UK in 1985.

A rather small book, at only 32 pages, it was aimed at children and getting them involved in and interested in cooking, but it is a joy for adults as well with 14 classic comfort food dishes as well as four ideas for making toast (i.e French toast or cinnamon toast). It is illustrated throughout with lovely little sketches of all the Pooh characters by Ernest H. Shepard and is appropriately shaped like an old fashioned honey jar. There was a companion volume, Pooh's Picnic Recipes that was published contemporaneously.

The author, Katie Stewart was the cooking editor for Woman's Journal at the time.

While technically not a seasonal cookbook, I have always associated it with fall, and its recipe for potato pancakes with bacon is one of my family's favourites for a cool October or November afternoon or evening.

As always we are sharing two recipes, as they originally appeared.

Potato pancakes with bacon

[Editor's note: When I have made these I like to serve them with sour cream for the pancakes, and I generally simply fry some good smoked bacon slices to accompany them as opposed to the grill method outlined below]


Serves 4

400 gr/ 1 lb. potatoes
1 onion
2 eggs
25g (2 oz. or two rounded tablespoons) plain flour
1 level teaspoon salt
pinch of pepper
8 bacon rashers
2-3 tablespoons oil for frying

Find a potato peeler a grater, a large mixing bowl, a wooden spoon for mixing and a tablespoon. Chose a large frying pan and find a pair of scissors for trimming the bacon rashers.


Peel the potatoes and the onion. Grate the potatoes and the onion, through the coarse side of a grater, into a large mixing basin.  Take care not to grate your fingers! Add the eggs, the flour, salt and pepper and using a wooden spoon mix the ingredients thoroughly. 

Using a pair of scissors, trim the rinds from the bacon rashers. Arrange the rashers neatly in the grill pan (remove the grid first). Place the fat part of each rasher overlapping the lean of the next and set aside ready for grilling.


Heat the oil in a frying pan and add the potato mixture in tablespoons at a time. Fry only 3-4 pancakes at a time as you spoon the mixture in flatten them slightly.

Fry the pancakes over a moderate heat until brown on the underside-it should take about 5 minutes. Then turn over and brown the second side.

As the pancakes are cooked, lift from the pan and place on a hot serving plate. Keep the prepared ones warm, while cooking the remainder. You should get about 12 pancakes.

When they are almost all ready, turn on the grill. Place the bacon rashers under the grill, about 7.5 cm (3") from the heat, and grill for about 3-5 minutes.

These are something to have when your friends come round for high tea. Get them to help you make them and serve straight away, together with the grilled bacon rashers.

Honey Cake

Makes 24 squares

175g (7 oz.) (or 7 rounded tablespoons) self raising flour
125g (5 oz.) butter or margarine
100g (4 oz.) (or 4 rounded tablespoons) soft brown sugar
150g (6 oz.) (or 6 rounded tablespoons) honey
2 eggs
1 tablespoon water

Find a sieve, a square of foil or greaseproof paper, a saucepan and a wooden spoon. Take an oblong cake tin of about 27.5 x 17.5 x 2.5 cm. (11"x7"x1") or a small roasting tin, grease the tin and line with a strip of greaseproof paper. Turn the oven heat on to moderate 180C (350F or Gas No. 4) and find a pair of oven gloves.

Sift the flour on to a square of greaseproof paper or foil and set aside.

Measure the butter or margarine and the sugar, honey and water into a saucepan. Place the pan over a low heat and stir with a wooden spoon until the fat has melted. Do not allow to boil. Draw the pan off the heat and allow to cool for about ten minutes.

Using a wooden spoon, beat the eggs into the honey mixture one at a time. Tip in the flour mixture all at once. Stir until it has blended and then beat thoroughly.

Pour into the prepared cake tin and spread evenly. Place in the centre of the preheated oven and bake for 30-35 minutes or until the cake is well risen.

Remove the cake from the oven using oven gloves. Loosen the sides of the cake with a knife and turn out. Allow to cool and then cut in squares.

Honey cake keeps well in a tin so you can take a piece out anytime your tummy rumbles.