Showing posts with label chicken. Show all posts

Thursday, April 16, 2020

Peruvian Inspired Rotisserie Chicken


Last year I did a take on Peruvian style chicken adapted for the charcoal BBQ. Here we are going to do a similar dish, only this time for a whole chicken done using a more traditional rotisserie method.

For this recipe you want to use your oven rotisserie function and tools if it has one, or, better yet, a home rotisserie unit.  A whole chicken of around 3 or 4 pounds works best.

To begin you need to make a marinading paste for the chicken.

Paste Ingredients:

1/4 cup white vinegar
3 tablespoons white wine
3 tablespoons canola oil
3 or 4 tablespoons garlic powder
2 tablespoons paprika
2 tablespoons cumin
sea salt and black pepper to taste

To begin, take all the ingredients and mix them together until they form a paste.


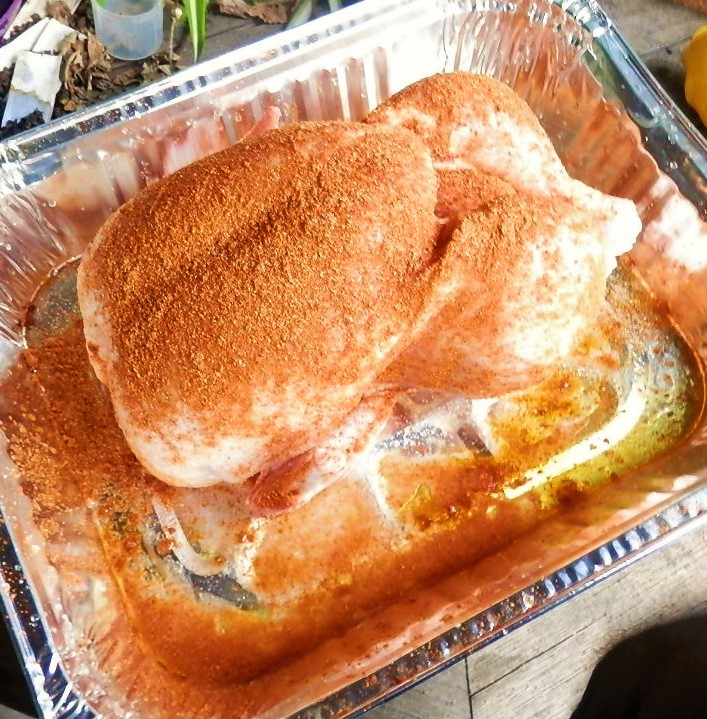
Place the chicken inside a large freezer bag and coat it all over with the paste. Let sit in the fridge for around 2-4 hours. You do not need to let it sit for longer than this and should not let it sit for more than 24 hours.


After resting in the paste before cooking.

Place the chicken onto the rotisserie and cook according to the instructions that accompany your rotisserie. Oven rotisserie and stand-up rotisserie times and temperatures vary, though generally the chicken will have to be cooked for around 20-25 minutes a pound.

Trust me, with this seasoning paste your house or apartment will smell fantastic as the chicken cooks!

Remember that according to Health Canada a whole chicken should be cooked to an internal temperature of 180 degrees.


After cooking let the chicken rest 10 minutes before carving.

It goes very well with some rice and roast potatoes as well as your favourite white wine.

Enjoy.


Saturday, February 29, 2020

Prosciutto and Swiss Roasted Chicken Thighs w. Mushrooms


If you are fond of the flavours of Chicken Cordon Bleu but are not feeling like Gordon Ramsey on an average weeknight this recipe combines Swiss cheese, prosciutto cotto and sauteed mushrooms with chicken and is spectacularly easy.

This method works best with chicken thighs. I like using bone-in, skin on thighs for an extra level of texture and flavour, but you can use boneless and skinless if you wish.

Place your thighs on a shallow roasting pan lined with parchment paper. Brush them with a little olive oil and then season them to taste with sea salt and black pepper.


Place the chicken in an oven preheated to 450 degrees. Roast for 25 minutes on the middle rack.

Meanwhile, saute around 2 cups of sliced mushrooms seasoned with sea salt and black pepper to taste in some olive oil for around 5-7 minutes over medium-high heat. Set aside.

After 25 minutes remove the thighs from the oven keeping the oven hot.

Top each one with a slice of prosciutto cotto and then Swiss cheese cut to fit. You can use any ham you like but I like prosciutto cotto because it is lean and flavourful. Then top each with some of the sauteed mushrooms.


Put the chicken back in the hot oven and cook for another 10 minutes.

Remove and let sit for 5 minutes before serving. Remember, if you are concerned Health Canada recommends cooking chicken pieces to an internal temperature of 75 C. / 165 degrees F. at the thickest part.


Melted cheese and prosciutto with sauteed mushrooms over seasoned roast chicken in just a few easy steps.

Enjoy.

For another one pan cheesy chicken dish see: Crispy Pan Roasted Parmesan Chicken

Thursday, January 16, 2020

Crispy Pan Roasted Parmesan Chicken


Today we are going to look at a one pan roasted chicken recipe that uses Parmesan cheese for both flavour and to achieve a wonderfully crispy skin without any frying.


Ingredients:

9 bone-in, skin-on chicken thighs
Coarse Sea Salt
Black Pepper
Cayenne Pepper
Garlic Powder
Lemon Juice
Olive Oil
1/2 cup freshly grated Parmesan Cheese


For this recipe we used chicken thighs as they are moist and produce the best results for high heat pan roasting.


Place your chicken thighs on a shallow, ridged roasting pan (lined with foil if you wish) and drizzle / brush the juice of about 1/4 of a lemon and about 1 tablespoon of olive oil over them evenly.

Then season them liberally (or to taste) with the salt, pepper, cayenne and garlic powder.

Place the thighs in an oven preheated to 450 degrees and roast for 20 minutes.

Keeping the oven hot, remove the thighs and sprinkle the 1/2 cup of freshly grated Parmesan cheese over them. The 1/2 cup is a guideline, you can use a little more if you wish. Be sure to use proper Parmesan cheese for this as, while a little more expensive, the pre-grated, powdery style does not work as well or taste as good.


Place the thighs back in the oven and roast for another 15 minutes at 450.

When finished cooking let sit for 5 minutes before serving. (Remember, if you are ever concerned, Health Canada says chicken is done when it has reached an internal temperature of 165 degrees)

The melted cheese, along with the oil and high heat, creates a crunchy, crispy skin that is very satisfying and that is hard to believe is not deep fried.


Goes well with anything you enjoy chicken with like sides of noodles, salad, rice and white wine.

Enjoy. 

Monday, December 9, 2019

White Wine & Vinegar Chicken w. Olives, Capers & Garlic

Today we are going to make a chicken dish that is colourful and totally delicious. It is prepared by first seasoning the chicken and cooking it in the oven in vinegar and wine and then covering it with a sauce based around this as well as olives, capers and garlic.

I have adapted this recipe from one that originally appeared in the New York Times. 

To start you want to season your chicken for baking. For this recipe we used 8 bone-in, skin-on chicken thighs.


Seasoning Blend:

1 teaspoon ground turmeric
1 teaspoon ground cumin
2 tablespoons olive oil
salt and pepper to taste

Toss your chicken in the olive oil. Place on a rimmed oven baking tray skin side up and then season with the turmeric, cumin, salt and pepper.

Once the seasoned chicken is in the tray, pour 1/4 cup of rice vinegar and 1/4 cup of dry white wine over and around the chicken.


Place in an oven preheated to 450 degrees and cook until done, 25-30 minutes.

Meanwhile, mix the following ingredients together in a bowl.

Sauce Ingredients:

1 1/2 to 2 cups of crushed, pitted green olives.
1 small jar of capers
2 -3 cloves of grated garlic
4 tablespoons olive oil

Once cooked, remove the tray from the oven and place the chicken on a platter.


Then, without cleaning or draining it in anyway add the sauce ingredients to the tray with the juices and vinegar and wine from cooking.


Using a spatula gently stir everything together making sure to scrap up any pieces or bits attached to the pan.

After you have fully blended everything add a cup of chopped fresh parsley and stir in.

Pour all the contents of the pan over the chicken and serve.


This dish goes well with  rice or egg noodles as a side.

Enjoy.


Tuesday, September 24, 2019

Spice Rub Charcoal BBQ Whole Chicken

Today we are going to take a look at cooking a whole chicken on the charcoal BBQ using a spice rub. This will make the chicken well seasoned, slightly spicy and nicely smokey.

To begin we want to prepare the rub. The amounts we used here should be enough to season two normal sized chickens.


Spice Rub Ingredients:

1 tablespoon hot chili powder
1 tablespoon paprika
1 tablespoon garlic powder
1 tablespoon mustard powder
1 tablespoon ground cumin
1 tablespoon ground coriander
1/2 tablespoon brown sugar
1 teaspoon cayenne pepper (or to taste)

Combine all the spices thoroughly.

Prepare your charcoal BBQ as usual.

Place you chicken on a platter or in a tray and drizzle some olive oil over it rubbing it around to make sure it gets on the whole bird. Then drizzle over the juice of half a lemon.

Thoroughly and evenly coat the chicken with the spice rub. Then season it with freshly ground sea salt to taste.


When your BBQ is ready place the chicken directly over the coals for one minute a side. Use tongs to carefully turn the chicken so you do this on all four sides.


Place the chicken in an aluminum BBQ or oven tray oiled on the bottom with olive oil. If you used the tray to season the bird make sure you rinse it out before reusing it and oiling it for cooking or any spices on the bottom of the tray will burn.


Cook the chicken in the tray over the coals for between 1 1/2 and 2 hours until done depending on the size. A chicken is thoroughly cooked when it has reached an internal temperature of 180 degrees at its thickest part according to Health Canada. 

To regulate the heat and the coals you want to cook primarily with the BBQ lid on (flue open) taking the lid off to get the coals going again every once and a while. I generally do lid on for 10-15 minutes, then lid off for around 5 minutes, then lid back on 10-15, etc.

When the chicken is cooked let rest on a platter 10 minutes before carving.


This delightfully smokey and flavorful dish pairs perfectly with sides of rice, grilled zucchini, and a garden salad. It also goes well with your favorite chilled white or rosé wine.

Enjoy.

See also: Charcoal BBQ Jerk Style Chicken

See also: Clay Baker Tandoori Style Chicken

Tuesday, September 3, 2019

Peruvian Inspired BBQ Chicken

This dish is inspired by a seasoning sauce and paste that is used as a marinade for rotisserie chicken in Peruvian recipes. I have modified it by adapting it for cooking chicken pieces on a charcoal BBQ. The marinade already makes the chicken very flavourful and the smokiness of the barbecuing enhances this.

I used this marinade to make 5 large chicken legs. It also works well with drumsticks or thighs.

Marinade Ingredients:

1/4 cup white vinegar
1/4 cup soy sauce
1/4 cup white wine
1/4 cup canola oil
juice of 1 lemon
900 - 1000 ml water
4-6 minced cloves of garlic
4 tablespoons cumin
2 tablespoons minced fresh ginger
2 tablespoons paprika
1 tablespoon black pepper
sea salt to taste


Combine all of these ingredients in a large bowl thoroughly.

Place your chicken in a large freezer bag and pour the marinade in making sure it covers it all.

Marinade in the refrigerator for at least 2 hours and ideally for 4 hours.

Prepare your charcoal grill as usual.

When ready to cook take the chicken out of the marinade and grill for 2-3 minutes a side directly over the charcoal. Do not discard the marinade.

Once you have finished grilling them place the legs in an aluminium cooking pan.

Pour the marinade out of the bag into the pan around the chicken. While you should always discard marinades used on raw meat if it is not going to be used in cooking, here the marinade will be boiled for an hour with the chicken as a sauce. Groups like the FDA and CDC note that marinade is safe to use again if it has been boiled but if you prefer, of course, you can simply make a second batch of marinade for the cooking and discard the first one.


Place the tray of chicken on the grill and cook in the boiling marinade for one hour turning once half way through. (Chicken legs are done when they have reached an internal temperature of 165 degrees F. according to Health Canada).


You should regulate the heat and smokiness by using the lid. I like to BBQ this way by having the lid on with the flue open for 10 minutes, off for 5, on again for 10, etc.

Serve the chicken removed from the sauce.

This chicken is perfect with rice. I like to drizzle some of the cooking sauce and some lime juice over it and serve it with a Caribbean style hot sauce on the side for dipping.

Enjoy.

Wednesday, July 3, 2019

Jerk Chicken Salad Sandwiches

Last June I shared a recipe for BBQed Jerk style chicken with a homemade marinade. When I BBQ chicken (or pretty much anything else for that matter) I generally make more than enough so that there will be leftovers.

Cold or reheated leftover jerk chicken is great. But sometimes I like to jazz things up a bit by making the leftovers into a Jerk chicken salad which is terrific on rye bread or kaisers.

Making jerk chicken salad is simplicity itself.


First, coarsely chop or pull apart the leftover meat and place in a large bowl making sure to remove any bones large or small. Do not remove the skin though, it goes great in the salad.

In a separate bowl combine the following ingredients thoroughly:

2 heaping tablespoons mayonnaise
1 teaspoon Dijon mustard
1 teaspoon West Indian style curry powder (if available, otherwise any curry powder will work)
2-3 dashes mustard powder
1-3 teaspoons hot sauce (I used Mr. Gouda's Fire in Jamaica hot sauce, but use whichever one you like)
salt and black pepper to taste

These portions can be increased if you have more leftovers but this worked for two large leftover chicken legs.

Toss the chicken and the sauce together until the chicken is evenly coated. Let sit for 15 minutes to half an hour and you are good to go. It is that easy.

This also works very well with other leftover chicken including fried chicken. Leftover spicy Popeye's chicken takes terrific turned into a chicken salad -- especially with the crispy skin -- though when it is not jerk chicken I generally leave out the teaspoon of curry powder.

As noted above this is delicious on rye or a kaiser. Top with tomato or lettuce or whatever else you like though I think it is delicious all on its own. It goes great with ice cold beer.

Enjoy.

Thursday, February 21, 2019

The Complete Book of Chicken Wings, 1985 w. Buffalo Wings, Tea Smoked, Maple Ginger Beans & more -- Vintage Cookbook TBT

Vintage Cookbook: The Complete Book of Chicken Wings, Joie Warner

Publication Details: Totem Books, 1985

Published in 1985 The Complete Book of Chicken Wings came out when the dish was still something of a novelty and had not yet exploded into the ubiquitous bar food that we know it as today.

The cookbook is written by Joie Warner, an acclaimed and prolific cooking writer who wrote for the Toronto Globe and Mail at the time. It begins with an overview of the history of the bar-style wing and its origins in Buffalo, New York at the famous Anchor Bar. There follows a section on techniques and then various sections devoted to different styles of chicken wings and sauces/side dishes.

Finally there is a humorously small section -- reflecting the far more limited range of options at the time -- that gives various places where you can eat wings in cities across North America including Canadian ones like London, Vancouver and Toronto. We have included this list as a walk down memory lane!

Otherwise we have focused on a few diverse recipes and sauces.

If you are a wing fan, tracking an edition of this one down (and there were many later ones) is a must.


Monday, January 21, 2019

Clay Baker Tandoori Style Chicken


Today we are going to look at a way to make chicken with Tandoori style seasoning using the clay baker. With a simple technique this method allows you to mimic the char that is produced when the chicken is made more traditionally in a clay Tandoor oven.

We used around 2 pounds of  drumsticks in this case, though this method also works well for skin-on, bone-in thighs, full legs or a combination of two or three of these.

The first thing to do is to prepare your seasoning blend.


Seasoning Ingredients:

2 tablespoons paprika
4 cloves of finely minced garlic
1 tablespoon of finely minced ginger
1 tablespoon black pepper
1 tablespoon ground cumin
1 tablespoon turmeric
1 teaspoon ground cardamom
2 teaspoons cayenne pepper (or to taste)
1 teaspoon ground cinnamon
1/2 teaspoon ground nutmeg
sea salt to taste

Thoroughly blend all the seasoning together.

Place your chicken pieces in a large bowl. Pour the juice of one lemon and drizzle around 1 tablespoon of olive oil over them. Sprinkle the seasoning blend on while tossing the pieces to evenly coat. Do not overcoat. If the pieces are evenly coated simply either discard or store any extra.

Add 1 cup of plain yogurt to the bowl and toss again until the chicken pieces are evenly coated as below.


Cover and let sit in the fridge for 2-3 hours.

Just before cooking take out your clay baker and soak as usual for 20 minutes. (If you are not familiar with clay baking you can learn the basics at this post).

Place your clay baker, covered, into a COLD oven (you must always place a clay baker into a cold oven), set to 425 degrees and cook for 45 minutes.

After 45 minutes remove the top of the clay baker. Do this very carefully as it will be exceptionally hot.

Turn the oven up to 500 degrees and bake the chicken uncovered in the bottom half of the clay baker for another 15 - 20 minutes or until the chicken is slightly charred or charred to your liking. (If you have any doubts about doneness the chicken is done when it has been cooked to at least 165 degrees.)


Serve with rice. Enjoy.

See also: Curry Flavoured Clay Baked Red Chicken

See also: Charcoal BBQ Jerk Style Chicken